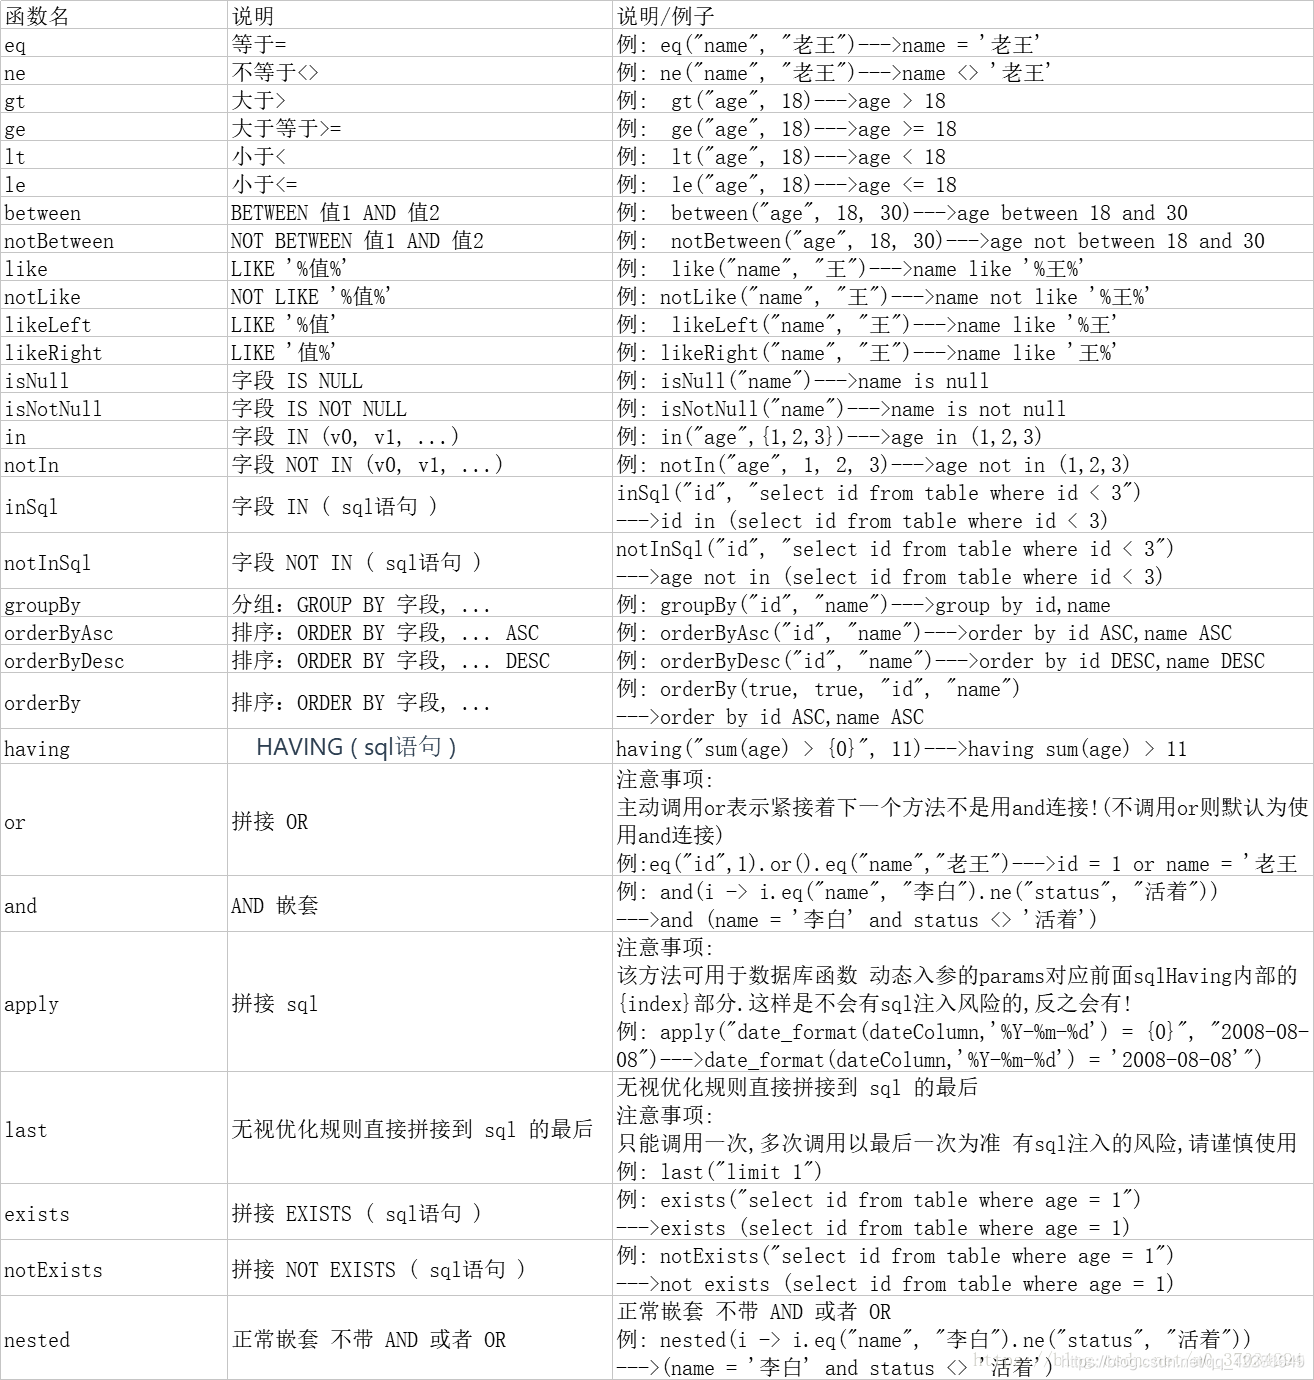
SpringBoot
1.SpringBoot简介
1.1 回顾Spring
Spring是一个开源的、轻量级的Java开发框架,广泛应用于企业级应用开发。它提供了很多功能,帮助开发人员简化复杂的应用开发工作。下面是Spring的一些优缺点:
优点:
- 松耦合:Spring通过依赖注入(DI)和面向切面编程(AOP)使得应用的各个部分松耦合,便于扩展和测试。
- 模块化:Spring框架有多个模块,可以根据需要选择适合的模块。例如:Spring Core、Spring AOP、Spring MVC、Spring Boot等。
- 开源与社区支持:Spring是一个开源框架,有着庞大的社区支持和丰富的文档资源,可以帮助开发人员解决遇到的技术问题。
缺点:
- 配置复杂性:虽然Spring Boot可以简化配置,但Spring传统的XML配置方式还是比较繁琐,尤其是在大型项目中配置文件可能非常庞大。
- 性能开销:由于Spring框架的高度抽象和大量的反射、动态代理等技术,可能会引入一定的性能开销。虽然这个问题在现代硬件上影响不大,但在一些高性能要求的场景下仍需要注意。
1.2 SpringBoot和Spring的区别
- 配置对象方式:
- Spring通过xml文件配置开启一些功能
- SpringBoot不需要xml文件,可以自动配置,只需要写一个配置类,使用@Configuration注解标注,即可配置
- @EnableAutoConfiguration扫描在spring.factories中的配置,然后通过@XxxxautoConfiguration进行扫描和配置所需要的Bean,自动的扫描Spring Boot项目引入的Maven依赖,只有用到的才会被创建成Bean,然后放到IOC容器内
- **容器:**Spring没有封装容器,SpringBoot内嵌了Tomcat容器
1.3 SpringBoot核心功能
- 起步依赖:
- 起步依赖本质上是一个Maven项目对象模型(Project Object Model,POM),定义了对其他库的传递依赖,这些东西加在一起即支持某项功能。
- 简单的说,起步依赖就是将具备某种功能的坐标打包到一起,并提供一些默认的功能。
- 自动配置:
- Spring Boot的自动配置是一个运行时(更准确地说,是应用程序启动时)的过程,考虑了众多因素,才决定Spring配置应该用哪个,不该用哪个。该过程是Spring自动完成的。
1.4 约定大于配置
约定大于配置,就是约定编程,是一种软件设计范式。简单来说,如果你所用工具的约定和你的期待相符,就可以省去配置;不符合的话,你就要通过相关的配置来达到你所期待的结果。
Maven项目的约定:
- 源码目录为 src/main/java/
- 测试目录为 src/test/java/
- 打包方式为 jar
- 包输出目录为target/
SpringBoot项目的约定
Spring Boot框架使用了特定的方式来进行配置,从而使开发人员不再需要定义样板化的配置。Spring Boot采用约定优于配置的方式,大量的减少了配置文件的使用。
实现举例:
- 自动配置:
- Spring Boot 会自动根据项目中添加的依赖来进行配置;
- 举例:添加
spring-boot-starter-web依赖,会自动配置一个嵌入式的 Tomcat 服务器以及与 Web 相关的默认设置
- 约定的目录结构:
- Spring Boot 提供了一些约定的项目结构,它自动扫描并初始化一些基础配置
- 举例:Spring Boot 会自动扫描
@SpringBootApplication注解所在包及其子包中的组件
- Spring Boot Starter:
- 提供了各种预配置的 Starter,可以很方便地引入常用的功能,开发者不需要关心具体的配置实现
- 举例:
spring-boot-starter-data-jpa让你可以很方便地使用 JPA 与数据库交互,而无需手动配置数据源、事务
实现方式:SPI
SPI(Service Provider Interface,服务提供者接口) 是一种通过接口和约定来实现服务提供者发现机制的技术。它允许模块或库在不修改客户端代码的情况下扩展功能。
- 使用默认的约定而不是配置文件
- 通过命名约定加载服务:约定目录、文件名称
2.SpringBoot快速入门
2.1 代码实现
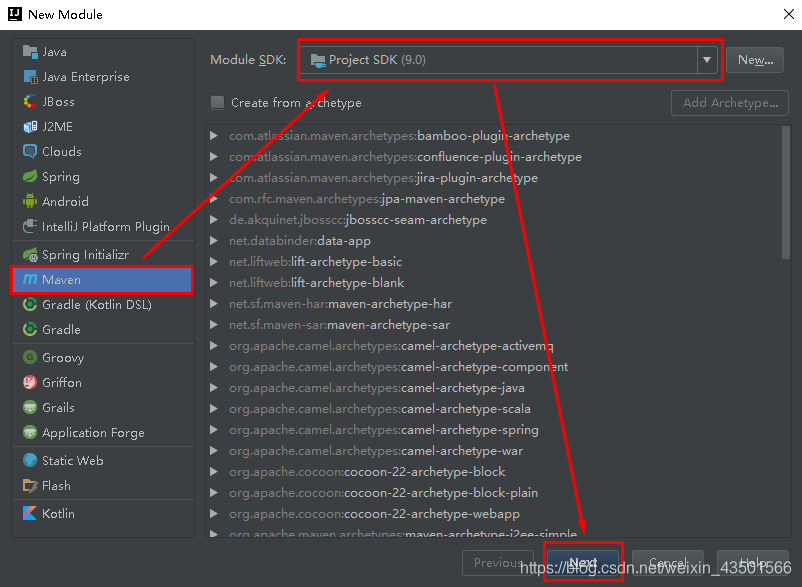
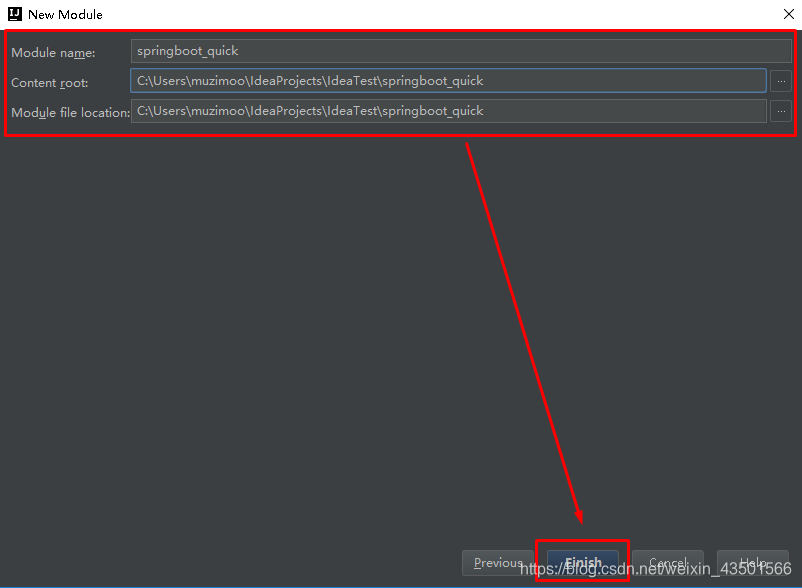
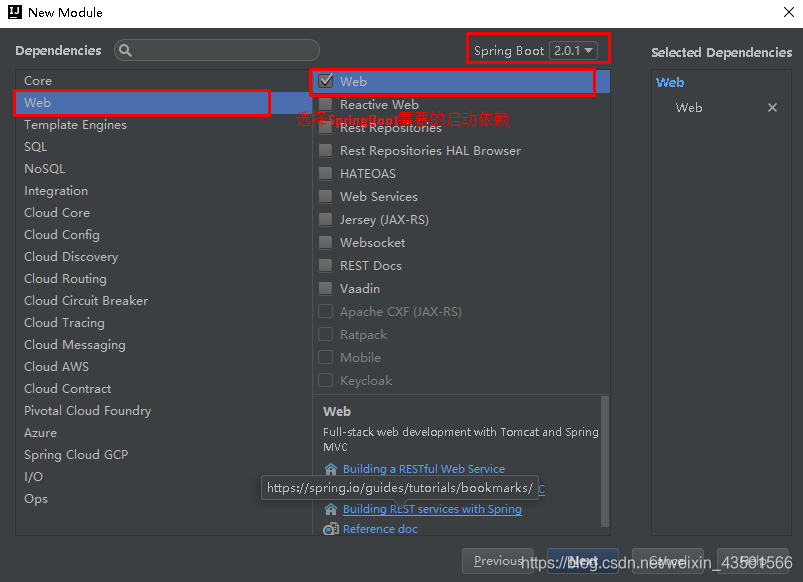
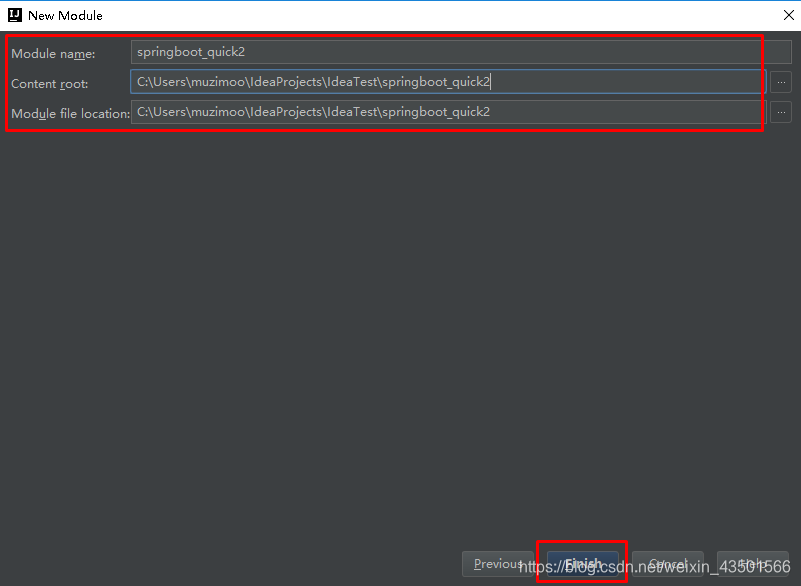
2.1.1 创建Maven工程
- 使用idea工具创建一个maven工程,该工程为普通的java工程

2.1.2 添加SpringBoot的起步依赖
- SpringBoot要求:项目要继承SpringBoot的起步依赖spring-boot-starter-parent
<parent>
    <groupId>org.springframework.boot</groupId>
    <artifactId>spring-boot-starter-parent</artifactId>
    <version>2.0.1.RELEASE</version>
</parent>
SpringBoot要集成SpringMVC进行Controller的开发,所以项目要导入web的启动依赖:
<dependencies>
    <dependency>
        <groupId>org.springframework.boot</groupId>
        <artifactId>spring-boot-starter-web</artifactId>
    </dependency>
</dependencies>
2.1.3 编写SpringBoot引导类
@SpringBootApplication
public class MySpringBootApplication {

    public static void main(String[] args) {
        SpringApplication.run(MySpringBootApplication.class);
    }

}
2.1.4 编写controller
@Controller
public class QuickStartController {
@RequestMapping("/quick")
@ResponseBody
public String quick(){
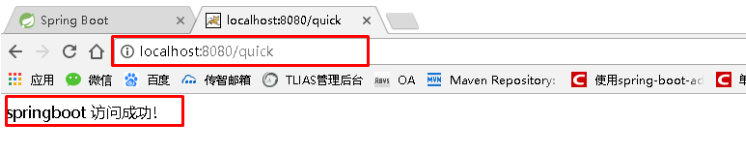
return "springboot 访问成功!";
}
}2.1.5 测试
执行SpringBoot起步类的主方法,控制台打印日志如下:
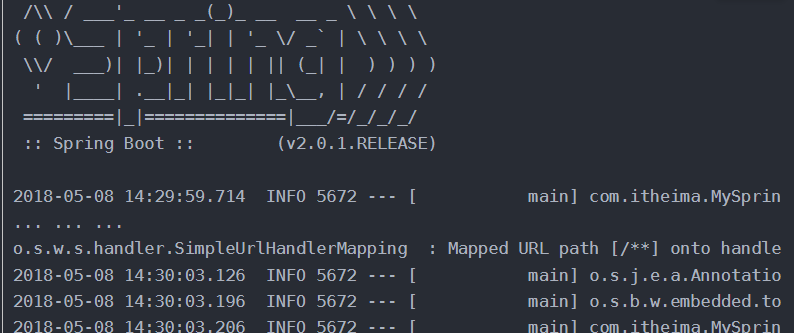
通过日志发现,Tomcat started on port(s): 8080 (http) with context path ‘’
tomcat已经起步,端口监听8080,web应用的虚拟工程名称为空
打开浏览器访问url地址为:http://localhost:8080/quick
2.2 快速入门解析
2.2.1 引导类解析
- @SpringBootApplication:标注SpringBoot的启动类,该注解具备多种功能(后面详细剖析)
- SpringApplication.run(MySpringBootApplication.class) 代表运行SpringBoot的启动类,参数为SpringBoot启动类的字节码对象
2.2.2 工程热部署解析
可以在修改代码后不重启就能生效,在 pom.xml 中添加如下配置就可以实现这样的功能,我们称之为热部署:
<!--热部署配置-->
<dependency>
<groupId>org.springframework.boot</groupId>
<artifactId>spring-boot-devtools</artifactId>
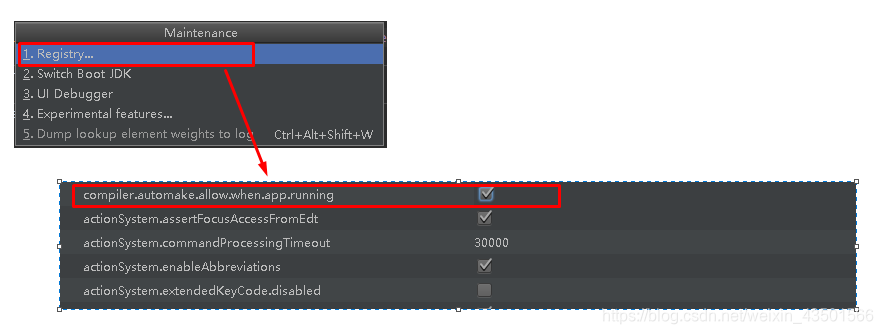
</dependency>注意:IDEA进行SpringBoot热部署失败原因
出现这种情况,并不是热部署配置问题,其根本原因是因为Intellij IEDA默认情况下不会自动编译,需要对IDEA进行自动编译的设置,如下:
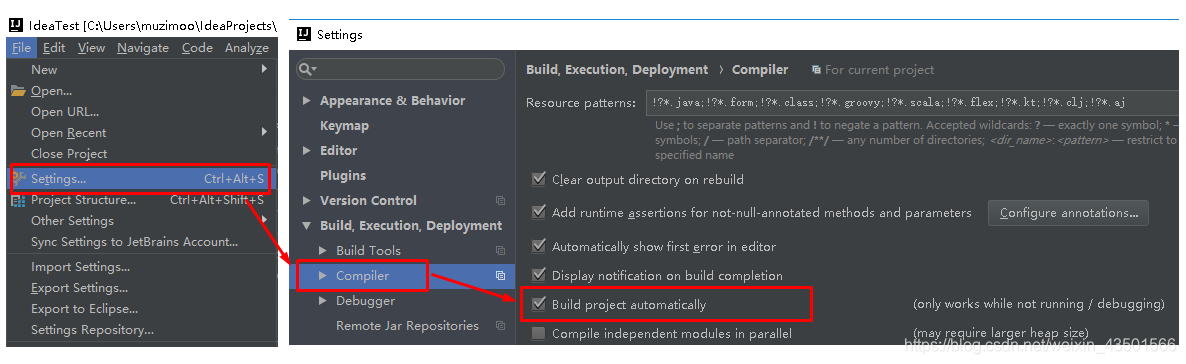
- 然后 Shift+Ctrl+Alt+/,选择Registry
2.3 使用Idea快速创建SpringBoot项目(自动导入依赖)
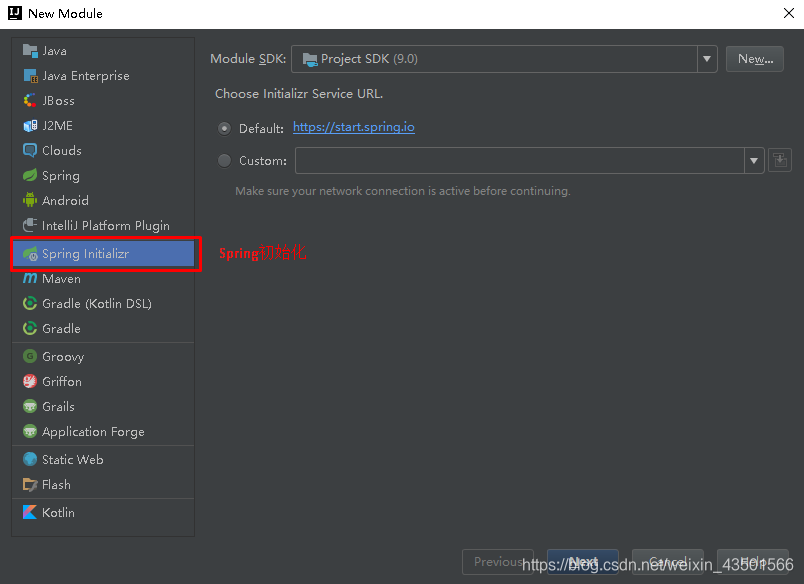
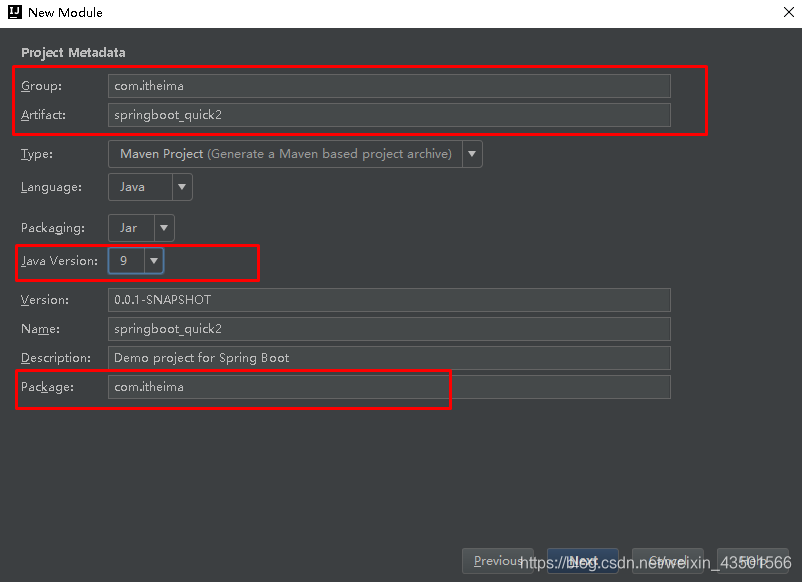
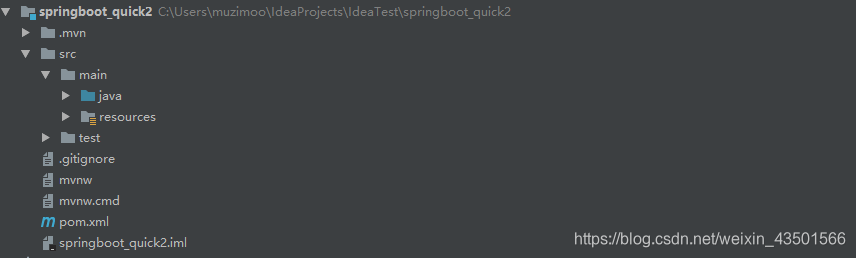
- 通过idea快速创建的SpringBoot项目的pom.xml中已经导入了我们选择的web的起步依赖的坐标
<?xml version="1.0" encoding="UTF-8"?>
<project xmlns="http://maven.apache.org/POM/4.0.0" xmlns:xsi="http://www.w3.org/2001/XMLSchema-instance"
	xsi:schemaLocation="http://maven.apache.org/POM/4.0.0 http://maven.apache.org/xsd/maven-4.0.0.xsd">
	<modelVersion>4.0.0</modelVersion>

	<groupId>com.itheima</groupId>
	<artifactId>springboot_quick2</artifactId>
	<version>0.0.1-SNAPSHOT</version>
	<packaging>jar</packaging>

	<name>springboot_quick2</name>
	<description>Demo project for Spring Boot</description>

	<parent>
		<groupId>org.springframework.boot</groupId>
		<artifactId>spring-boot-starter-parent</artifactId>
		<version>2.0.1.RELEASE</version>
		<relativePath/> <!-- lookup parent from repository -->
	</parent>

	<properties>
		<project.build.sourceEncoding>UTF-8</project.build.sourceEncoding>
		<project.reporting.outputEncoding>UTF-8</project.reporting.outputEncoding>
		<java.version>9</java.version>
	</properties>

	<dependencies>
		<dependency>
			<groupId>org.springframework.boot</groupId>
			<artifactId>spring-boot-starter-web</artifactId>
		</dependency>

		<dependency>
			<groupId>org.springframework.boot</groupId>
			<artifactId>spring-boot-starter-test</artifactId>
			<scope>test</scope>
		</dependency>
	</dependencies>

	<build>
		<plugins>
			<plugin>
				<groupId>org.springframework.boot</groupId>
				<artifactId>spring-boot-maven-plugin</artifactId>
			</plugin>
		</plugins>
	</build>


</project>
可以使用快速入门的方式创建Controller进行访问,此处不再赘述
3.SpringBoot启动流程
SpringBoot启动依靠的是带有main方法的启动类
启动类的内容可以分为两个部分:@SpringBootApplication注解、main方法里的SpringApplication.run(启动类.class,args)方法。
下面主要就是分析一下这两部分分别是什么作用?完成了什么功能?怎样实现的自动装配?以及SpringBoot的启动流程分析?
3.1 @SpringBootApplication注解剖析
@SpringBootApplication是个组合注解包含四个元注解和==@SpringBootConfiguration、@EnableAutoConfiguration、@ComponentScan==组成
@Target(ElementType.TYPE)
@Retention(RetentionPolicy.RUNTIME)
@Documented
@Inherited
@SpringBootConfiguration
@EnableAutoConfiguration
@ComponentScan(excludeFilters = { @Filter(type = FilterType.CUSTOM, classes = TypeExcludeFilter.class),
		@Filter(type = FilterType.CUSTOM, classes = AutoConfigurationExcludeFilter.class) })
3.1.1 @SpringBootConfiguration
- @SpringBootConfiguration也是一个组合注解由元注解和@Configuration构成
- @Configuration注解作用:将当前类申明为配置类,相当于Spring中的xml配置
@Target(ElementType.TYPE)
@Retention(RetentionPolicy.RUNTIME)
@Documented
@Configuration
3.1.2 @EnableAutoConfiguration
1. @EnableAutoConfiguration也是一个组合注解由元注解和@AutoConfigurationPackage、@Import注解构成
1. 作用:通过内部的方法,**扫描类路径下的META-INF/spring.factories配置文件**(key-value),将其中的 org.springframework.boot.autoconfigure.EnableAutoConfiguration ==对应的配置项实例化并且注册到spring容器==@Target(ElementType.TYPE)
@Retention(RetentionPolicy.RUNTIME)
@Documented
@Inherited
@AutoConfigurationPackage
@Import(AutoConfigurationImportSelector.class)3.1.3 @ComponentScan
- 作用:扫描当前包以及子包,将有@Component,@Controller,@Service,@Repository等注解的类注册到容器中
3.2 SpringApplication.run()原理解析
通过启动类的main方法启动springboot应用程序。
执行main方法分为两步:
创建并初始化SpringApplication
- 从类路径中推断并设置应用类型。
- 从SpringFactories文件中找到配置的事件监听器,并保存起来
- 推断运行主类
执行SpringApplication.run()方法(创建了配置环境Environment、监听器Listener、应用上下文ApplicationContext,在此基础上实例化我们所需要的bean)
- 创建了应用的监听器SpringApplicationRunListeners并开始监听
- 加载SpringBoot配置环境(ConfigurableEnvironment)
- 创建run方法的返回对象:ConfigurableApplicationContext(应用配置上下文)。ConfigurableApplicationContext是ApplicationContext的子类,该接口的主要任务就是配置应用上下文功能
- 回到run方法内,prepareContext方法将listeners、environment、applicationArguments、banner等重要组件与上下文对象关联。
- 加载spring.factories,bean的实例化等核心工作
- 启动监听器,通知程序运行。
3.3 总结
1.4.1 SpringBoot原理
包装spring核心注解
@SpringBootApplication
	@SpringBootConfiguration
		@Configuration		 // 将当前类申明为配置类,相当于Spring中的xml配置
    @EnableAutoConfiguation  // 扫描类路径下的META-INF/spring.factories,将对应的配置项实例化并且注册到spring容器
    @ComponentScan      	 // 扫描当前包以及子包,将有@Component,@Controller,@Service,等注解的类注册到容器中
使用springmvc无xml进行启动
通过自定义starter和maven依赖简化开发代码
开发者能够快速整合第三方框架
通过java语言内嵌入tomcat
1.4.2SpringBoot启动流程
--------------------------------创建springbootApplication对象--------------------------------
创建springbootApplication对象、springboot容器,初始化操作
获取当前应用的启动类型。通过判断当前classpath是否加载servlet类,返回servlet web启动方式。webApplicationType三种类型:
reactive:响应式启动(spring5新特性)
none:即不嵌入web容器启动(springboot放在外部服务器运行 )
servlet:基于web容器进行启动
读取springboot下的META-INFO/spring.factories文件,获取对应的ApplicationContextInitializer装配到集合
读取springboot下的META-INFO/spring.factories文件,获取对应的ApplicationListener装配到集合
mainApplicationClass,获取当前运行的主函数
--------------------------------调用springbootApplication对象的run方法,实现启动,返回当前容器的上下文--------------------------------
- 调用run方法启动
- StopWatch stopWatch = new StopWatch(),记录项目启动时间
- getRunListeners,读取META-INF/spring.factores,将SpringApplicationRunListeners类型存到集合中
- listeners.starting():循环调用starting方法
- prepareEnvironment(listeners, applicationArguments);将配置文件读取到容器中 读取多数据源:classpath:/,classpath:/config/,file:./,file:./config/底下。其中classpath是读取编译后的,file是读取编译前的 支持yml,yaml,xml,properties
- Banner printedBanner = printBanner(environment);开始打印banner图,就是sprongboot启动最开头的图案
- 初始化AnnotationConfigServletWebServerApplicationContext对象
- 刷新上下文,调用注解,refreshContext(context);
- 创建tomcat
- 加载springmvc
- 刷新后的方法,空方法,给用户自定义重写afterRefresh()
- stopWatch.stop();结束计时
- 使用广播和回调机制告诉监听者springboot容器已经启动化成功,listeners.started(context);
- 使用广播和回调机制告诉监听者springboot容器已经启动化成功,listeners.started(context);
- 返回上下文
4.SpringBoot的配置文件
4.1 SpringBoot配置文件的类型及作用
4.1.1 配置文件类型及作用
如果想使用自己的配置替换默认配置的话,就可以使用application.properties或者application.yml(application.yaml)进行配置。
SpringBoot默认会从Resources目录下加载application.properties或application.yml(application.yaml)文件
其中,application.properties文件是键值对类型的文件,之前一直在使用,所以此处不在对properties文件的格式进行阐述。除了properties文件外,SpringBoot还可以使用yml文件进行配置,下面对yml文件进行讲解。
4.1.2 application.properties
# 数据库连接配置
spring.datasource.url=jdbc:mysql://localhost:3306/mydatabase
spring.datasource.username=root
spring.datasource.password=123456
spring.datasource.driver-class-name=com.mysql.jdbc.Driver
4.1.3 application.yml或application.yaml
# 数据库连接配置
spring:
  datasource:
    url: jdbc:mysql://localhost:3306/mydatabase
    username: root
    password: 123456
    driver-class-name: com.mysql.jdbc.Driver
4.1.4 读取配置文件数据
- application.yml
person:
  name: zhangsan
age: 18- 读取
@Value("${person.name}")
private String name;
@Value("${person.age}")
private Integer age;
4.2 配置文件的加载顺序
4.2.1 项目内配置文件加载顺序
(1)不同目录的配置文件的加载顺序
- Springboot程序启动时,会从以下位置加载配置文件:优先级由高到底,高优先级的配置会覆盖低优先级的配置,没有的配置进行互补配置
优先级1:项目路径下的config文件夹配置文件
优先级2:项目的根目录下面配置文件
优先级3:资源路径下的config文件夹配置文件
优先级4:资源路径下配置文件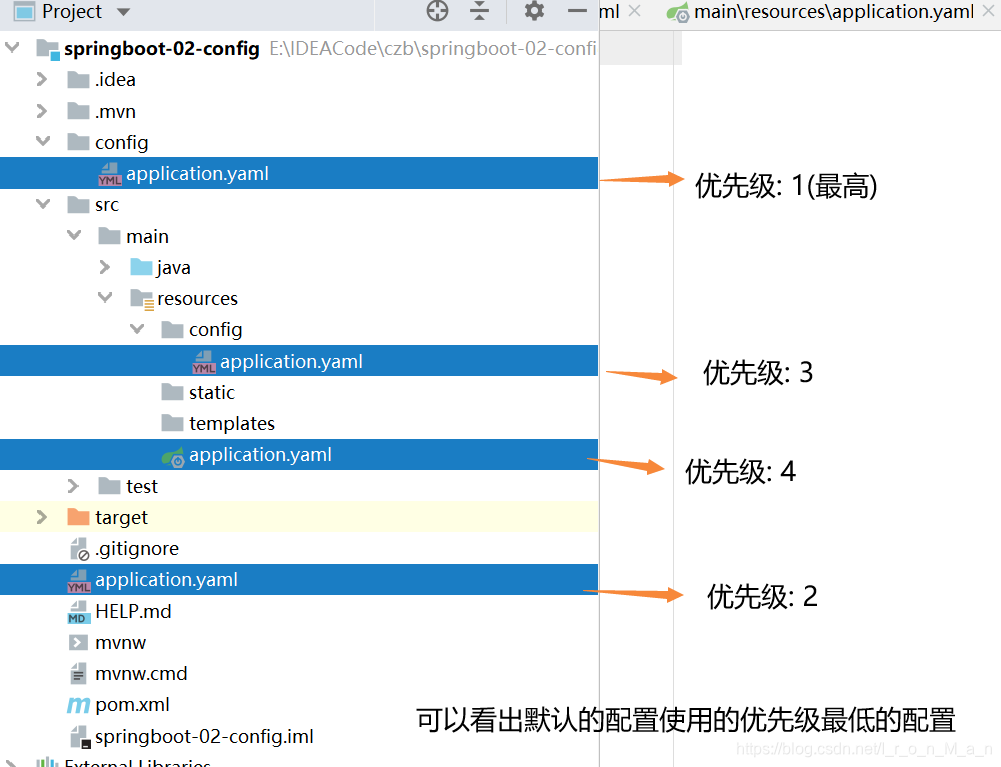
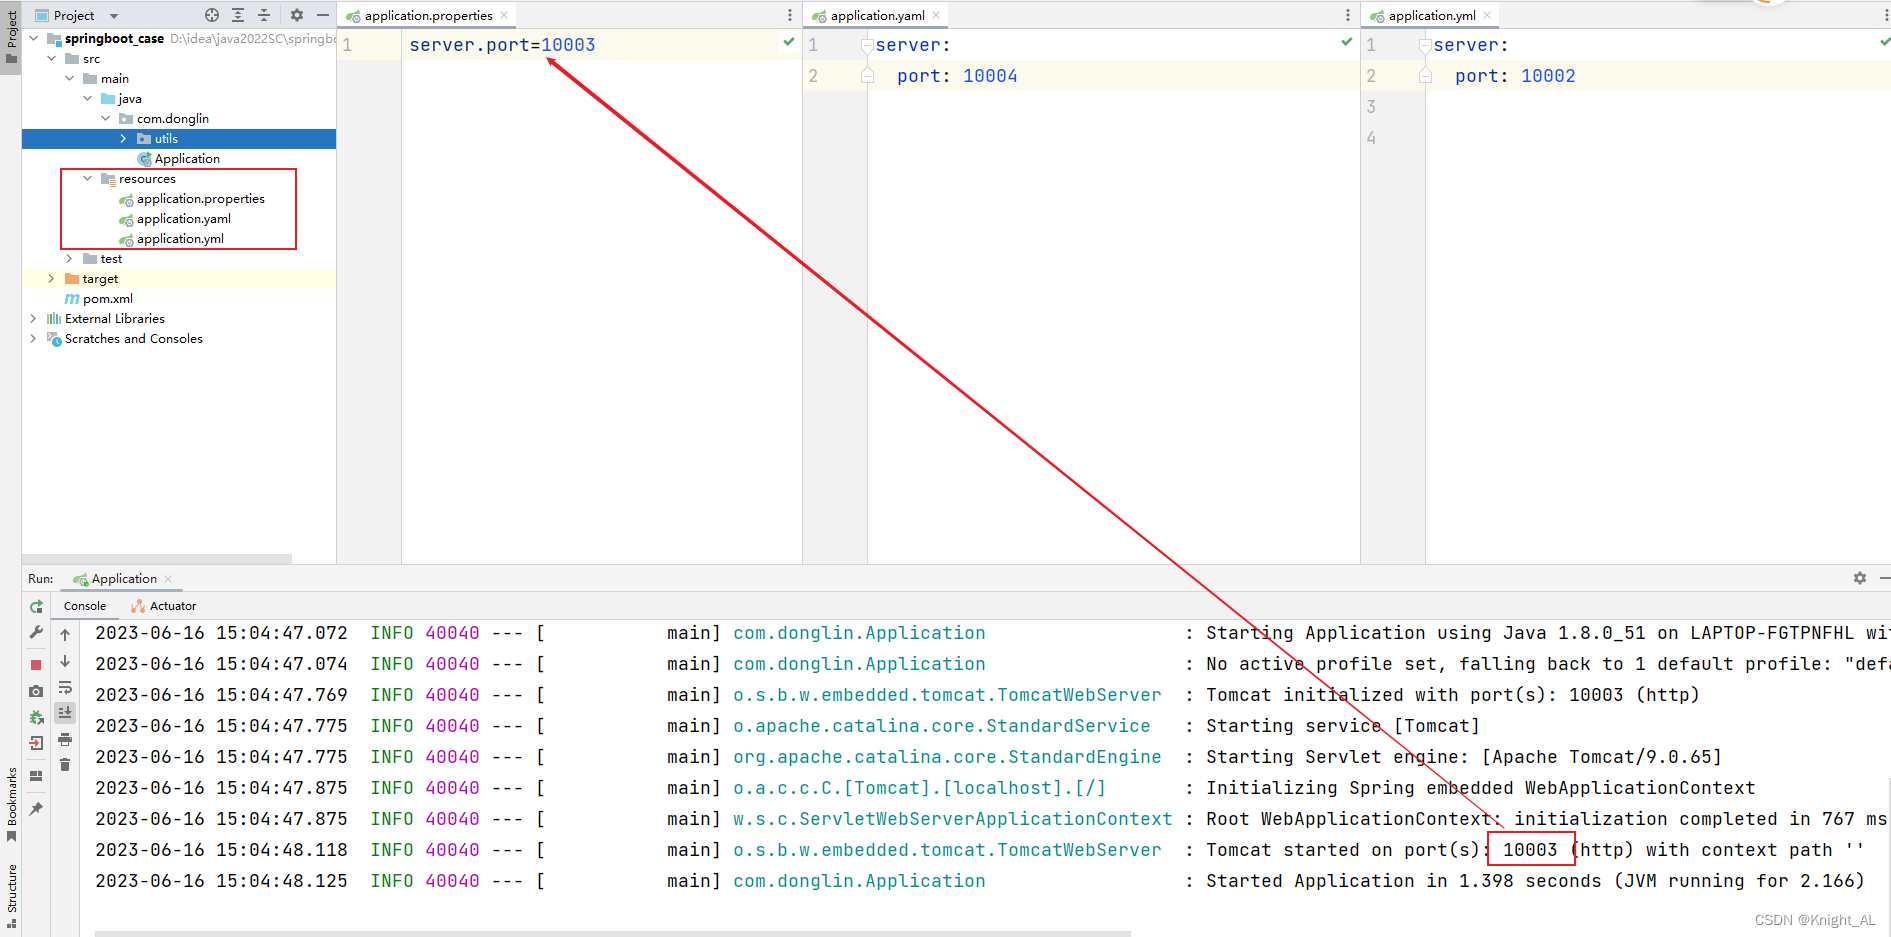
(2)同一目录、不同后缀的配置文件加载顺序
当properties、yaml和yml三种文件路径相同时,三个文件中的配置信息都会生效,但是当三个文件中有配置信息冲突时,加载顺序是
优先级低的配置会被先加载,所以优先级高的配置会覆盖优先级低的配置。
properties(最高)> yml > yaml(最低)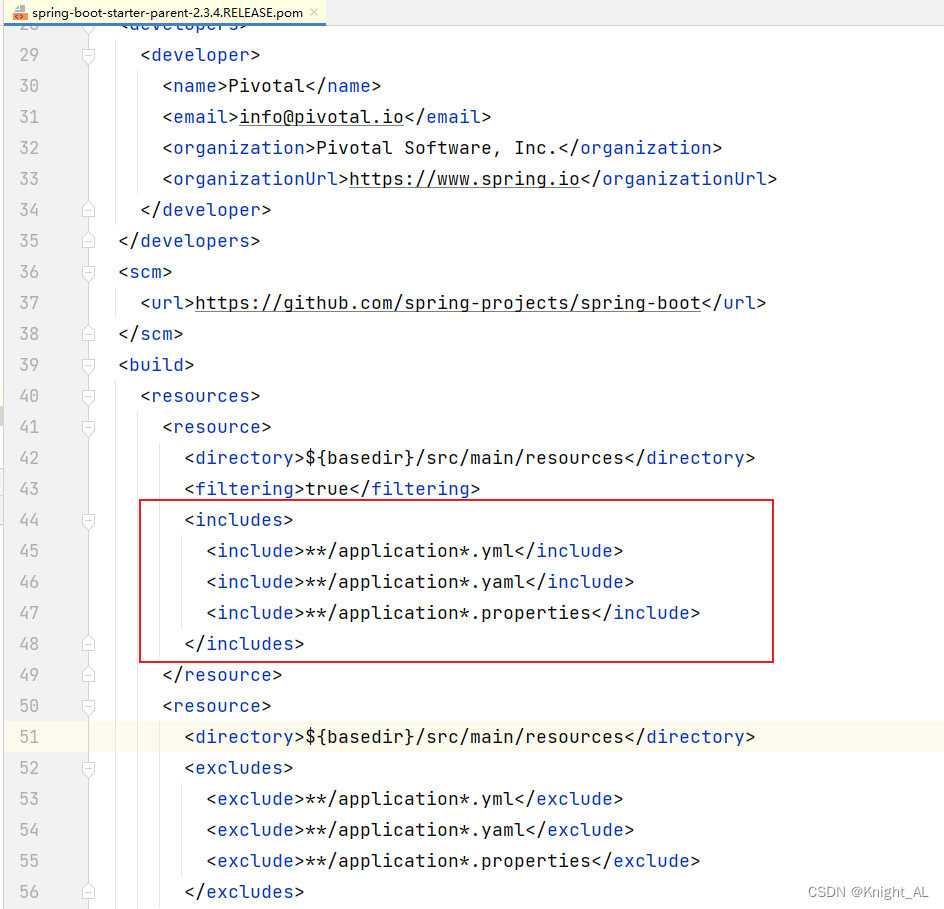
- 验证:
4.2.2 外部配置文件
当我们把项目打包后,如何在配置SpringBoot项目呢?
(1)命令行参数
项目打包好以后,我们可以使用命令行参数的形式,来改变想改变的几个参数,直接在启动命令后添加启动参数,如果有多个配置项,可以用空格分开。
java -jar springboot-configuration.jar --server.port=8088 --server.servlet.context-path=/spring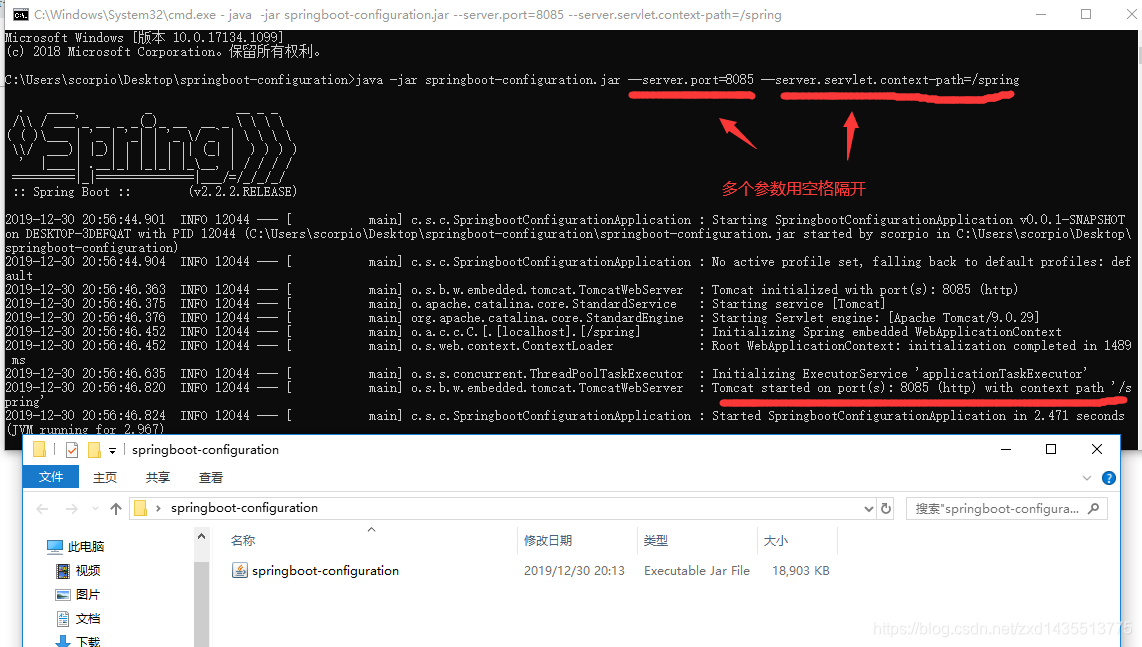
(2)spirng.config.location
在第一种情况下,如果参数数量过多,我们就要考虑配置文件了,我们在启动项目的时候可以用spring.config.location来指定配置文件的新位置。指定的配置文件和jar包中默认加载的配置文件共同起作用形成互补配置。
指定配置文件从F盘下读取
java -jar springboot-configuration.jar --spring.config.location=F:/application.properties
4.3 多环境配置
4.3.1 多文件配置多个环境
- 环境区分:
dev:开发环境 test:测试环境 prod:生产环境(线上)
- 三个环境配置文件
application-dev.yml
application-test.yml
application-prod.yml
- 指定文件生效:在application.yml指定
spring:
	profiles:
		active:dev
4.3.2 单个文件配置多个环境
不需要创建多个文件来区分了,直接以 三个横杠 来当做一个配置文件环境。
以下案例就是分为了两个环境,然后最上方active来指定对应的profiles环境
spring:
  profiles:
    active: prod

---
server:
  port: 8083
spring:
  profiles: dev


---

server:
  port: 8084
spring:
  profiles: prod
4.3.3 补充:命令行指定
java -jar spring-boot-02-config-0.0.1-SNAPSHOT.jar --spring.profiles.active=dev;5.SpringBoot整合其他技术
5.1 SpringBoot整合Junit
5.1.1 添加依赖
<!--测试的起步依赖-->
<dependency>
    <groupId>org.springframework.boot</groupId>
    <artifactId>spring-boot-starter-test</artifactId>
    <scope>test</scope>
</dependency>
5.1.2 编写测试类
@RunWith(SpringRunner.class)
@SpringBootTest(classes = MySpringBootApplication.class)
public class MapperTest {

    @Autowired
    private UserMapper userMapper;

    @Test
    public void test() {
        List<User> users = userMapper.queryUserList();
        System.out.println(users);
    }
}
其中,SpringRunner继承自SpringJUnit4ClassRunner,使用哪一个Spring提供的测试测试引擎都可以
public final class SpringRunner extends SpringJUnit4ClassRunner@SpringBootTest的属性指定的是引导类的字节码对象
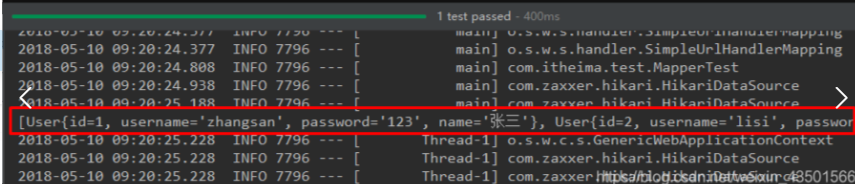
5.1.3 控制台
5.2 SpringBoot整合Mybatis
5.2.1 添加依赖
<!--mybatis起步依赖-->
<dependency>
    <groupId>org.mybatis.spring.boot</groupId>
    <artifactId>mybatis-spring-boot-starter</artifactId>
    <version>1.1.1</version>
</dependency>
5.2.2 添加数据库驱动
<!-- MySQL连接驱动 -->
<dependency>
    <groupId>mysql</groupId>
    <artifactId>mysql-connector-java</artifactId>
</dependency>
5.2.3 添加数据库连接
spring:
  datasource:
    url: jdbc:mysql://localhost:3306/mydatabase
    username: root
    password: 123456
    driver-class-name: com.mysql.jdbc.Driver
5.2.4 创建user表
在test数据库中创建user表
-- ----------------------------
-- Table structure for `user`
-- ----------------------------
DROP TABLE IF EXISTS `user`;
CREATE TABLE `user` (
  `id` int(11) NOT NULL AUTO_INCREMENT,
  `username` varchar(50) DEFAULT NULL,
  `password` varchar(50) DEFAULT NULL,
  `name` varchar(50) DEFAULT NULL,
  PRIMARY KEY (`id`)
) ENGINE=InnoDB AUTO_INCREMENT=10 DEFAULT CHARSET=utf8;

-- ----------------------------
-- Records of user
-- ----------------------------
INSERT INTO `user` VALUES ('1', 'zhangsan', '123', '张三');
INSERT INTO `user` VALUES ('2', 'lisi', '123', '李四');
5.2.5 创建实体Bean
public class User {
    // 主键
    private Long id;
    // 用户名
    private String username;
    // 密码
    private String password;
    // 姓名
    private String name;

    //此处省略getter和setter方法 .. ..

}
5.2.6 编写Mapper接口
@Mapper
public interface UserMapper {
	public List<User> queryUserList();
}
5.2.7 配置Mapper映射文件
<?xml version="1.0" encoding="utf-8" ?>
<!DOCTYPE mapper PUBLIC "-//mybatis.org//DTD Mapper 3.0//EN" "http://mybatis.org/dtd/mybatis-3-mapper.dtd" >
<mapper namespace="com.itheima.mapper.UserMapper">
    <select id="queryUserList" resultType="user">
        select * from user
    </select>
</mapper>
5.2.8 在application.properties添加映射文件信息
#spring集成Mybatis环境
#pojo别名扫描包
mybatis.type-aliases-package=com.itheima.domain
#加载Mybatis映射文件
mybatis.mapper-locations=classpath:mapper/*Mapper.xml
5.2.9 controller层
@Controller
public class MapperController {

    @Autowired
    private UserMapper userMapper;

    @RequestMapping("/queryUser")
    @ResponseBody
    public List<User> queryUser(){
        List<User> users = userMapper.queryUserList();
        return users;
    }

}
5.2.10 测试

5.3 SpringBoot整合Redis
- 笔记链接:
5.4 SpringBoot整合Mybatis Plus
5.4.1 导入依赖
<!-- mybatisPlus 核心库 -->
<dependency>
    <groupId>com.baomidou</groupId>
    <artifactId>mybatis-plus-boot-starter</artifactId>
    <version>3.1.0</version>
</dependency>
<dependency>
    <groupId>mysql</groupId>
    <artifactId>mysql-connector-java</artifactId>
</dependency>
5.4.2 yml配置
server:
  port: 10100   #  配置启动端口号

mybatis:
  config-location: classpath:mybatis.cfg.xml    #  mybatis主配置文件所在路径
  type-aliases-package: com.demo.drools.entity  #  定义所有操作类的别名所在包
  mapper-locations:                                     #  所有的mapper映射文件
    - classpath:mapper/*.xml


spring: #springboot的配置
  datasource: #定义数据源
    #127.0.0.1为本机测试的ip,3306是mysql的端口号。serverTimezone是定义时区,照抄就好,mysql高版本需要定义这些东西
    #useSSL也是某些高版本mysql需要问有没有用SSL连接
    url: jdbc:mysql://127.0.0.1:3306/test?serverTimezone=GMT%2B8&useSSL=FALSE
    username: root  #数据库用户名,root为管理员
    password: 123456 #该数据库用户的密码
    # 使用druid数据源
    type: com.alibaba.druid.pool.DruidDataSource

# mybatis-plus相关配置
mybatis-plus:
  # xml扫描,多个目录用逗号或者分号分隔(告诉 Mapper 所对应的 XML 文件位置)
  mapper-locations: classpath:mapper/*.xml
  # 以下配置均有默认值,可以不设置
  global-config:
    db-config:
      #主键类型 AUTO:"数据库ID自增" INPUT:"用户输入ID",ID_WORKER:"全局唯一ID (数字类型唯一ID)", UUID:"全局唯一ID UUID";
      id-type: auto
      #字段策略 IGNORED:"忽略判断"  NOT_NULL:"非 NULL 判断")  NOT_EMPTY:"非空判断"
      field-strategy: NOT_EMPTY
      #数据库类型
      db-type: MYSQL
  configuration:
    # 是否开启自动驼峰命名规则映射:从数据库列名到Java属性驼峰命名的类似映射
    map-underscore-to-camel-case: true
    # 如果查询结果中包含空值的列,则 MyBatis 在映射的时候,不会映射这个字段
    call-setters-on-nulls: true
    # 这个配置会将执行的sql打印出来,在开发或测试的时候可以用
    log-impl: org.apache.ibatis.logging.stdout.StdOutImpl
5.4.3 用户信息实体
@Data
@TableName("user_info")//@TableName中的值对应着表名
public class UserInfoEntity {
    /**
     * 主键
     * @TableId中可以决定主键的类型,不写会采取默认值,默认值可以在yml中配置
     * AUTO: 数据库ID自增
     * INPUT: 用户输入ID
     * ID_WORKER: 全局唯一ID,Long类型的主键
     * ID_WORKER_STR: 字符串全局唯一ID
     * UUID: 全局唯一ID,UUID类型的主键
     * NONE: 该类型为未设置主键类型
     */
    @TableId(type = IdType.AUTO)
    private Long id;
    /**
     * 姓名
     */
    private String name;
    /**
     * 年龄
     */
    private Integer age;
    /**
     * 技能
     */
    private String skill;
    /**
     * 评价
     */
    private String evaluate;
    /**
     * 分数
     */
    private Long fraction;
}
5.4.4 配置类
public class MybatisPlusConfig {
    /**
     * mybatis-plus SQL执行效率插件【生产环境可以关闭】
     */
    @Bean
    public PerformanceInterceptor performanceInterceptor() {
        return new PerformanceInterceptor();
    }
    /**
     * 分页插件
     */
    @Bean
    public PaginationInterceptor paginationInterceptor() {
        return new PaginationInterceptor();
    }
}
5.4.5 启动类
@SpringBootApplication
//@MapperScan和dao层添加@Mapper注解意思一样
@MapperScan(basePackages = "com.demo.drools.dao")
public class DroolsApplication {
    public static void main(String[] args) {
        SpringApplication.run(DroolsApplication.class, args);
    }
}
5.4.6 Dao层
@Mapper
public interface UserInfoDao extends BaseMapper<UserInfoEntity> {
}
5.4.7 Service层
public interface UserInfoService extends IService<UserInfoEntity> {

}@Service
public class UserInfoSerivceImpl extends ServiceImpl<UserInfoDao, UserInfoEntity> implements UserInfoService {
}5.4.8 扩展:Mybatis Plus的核心
Mybatis Plus的核心为QueryWrapper、UpdateWrapper
- QueryWrapper: Entity 对象封装操作
- UpdateWrapper : Update 条件封装,用于Entity对象更新操作
- 条件构造器使用中的各个方法格式和说明
6.SpringBoot实现拦截器
6.1 拦截器介绍
拦截器(Interceptor)同 Filter 过滤器一样,它俩都是面向切面编程——AOP 的具体实现(AOP切面编程只是一种编程思想而已)。
你可以使用 Interceptor 来执行某些任务,例如在 Controller 处理请求之前编写日志,添加或更新配置…
在 Spring中,当请求发送到 Controller 时,在被Controller处理之前,它必须经过 Interceptors(0或多个)。
6.2 拦截器作用
- 日志记录:记录请求信息的日志,以便进行信息监控、信息统计、计算 PV(Page View)等;
- 权限检查:如登录检测,进入处理器检测是否登录;
- 性能监控:通过拦截器在进入处理器之前记录开始时间,在处理完后记录结束时间,从而得到该请求的处理时间。(反向代理,如 Apache 也可以自动记录)
- 通用行为:读取 Cookie 得到用户信息并将用户对象放入请求,从而方便后续流程使用,还有如提取 Locale、Theme 信息等,只要是多个处理器都需要的即可使用拦截器实现。
6.3 自定义拦截器
如果你需要自定义 Interceptor 的话必须实现 org.springframework.web.servlet.HandlerInterceptor接口或继承 org.springframework.web.servlet.handler.HandlerInterceptorAdapter类,并且需要重写下面下面 3 个方法:
- preHandler(HttpServletRequest request, HttpServletResponse response, Object handler) 方法在请求处理之前被调用。该方法在 Interceptor 类中最先执行,用来进行一些前置初始化操作或是对当前请求做预处理,也可以进行一些判断来决定请求是否要继续进行下去。该方法的返回至是 Boolean 类型,当它返回 false 时,表示请求结束,后续的 Interceptor 和 Controller 都不会再执行;当它返回为 true 时会继续调用下一个 Interceptor 的 preHandle 方法,如果已经是最后一个 Interceptor 的时候就会调用当前请求的 Controller 方法。
- postHandler(HttpServletRequest request, HttpServletResponse response, Object handler, ModelAndView modelAndView) 方法在当前请求处理完成之后,也就是 Controller 方法调用之后执行,但是它会在 DispatcherServlet 进行视图返回渲染之前被调用,所以我们可以在这个方法中对 Controller 处理之后的 ModelAndView 对象进行操作。
- afterCompletion(HttpServletRequest request, HttpServletResponse response, Object handle, Exception ex) 方法需要在当前对应的 Interceptor 类的 postHandler 方法返回值为 true 时才会执行。顾名思义,该方法将在整个请求结束之后,也就是在 DispatcherServlet 渲染了对应的视图之后执行。此方法主要用来进行资源清理。
6.3.1 LogInterceptor类
public class LogInterceptor extends HandlerInterceptorAdapter {

    @Override
    public boolean preHandle(HttpServletRequest request, HttpServletResponse response, Object handler) throws Exception {
        long startTime = System.currentTimeMillis();
        System.out.println("\n-------- LogInterception.preHandle --- ");
        System.out.println("Request URL: " + request.getRequestURL());
        System.out.println("Start Time: " + System.currentTimeMillis());

        request.setAttribute("startTime", startTime);

        return true;
    }

    @Override
    public void postHandle(HttpServletRequest request, HttpServletResponse response, Object handler, ModelAndView modelAndView) throws Exception {
        System.out.println("\n-------- LogInterception.postHandle --- ");
        System.out.println("Request URL: " + request.getRequestURL());
    }

    @Override
    public void afterCompletion(HttpServletRequest request, HttpServletResponse response, Object handler, Exception ex) throws Exception {
        System.out.println("\n-------- LogInterception.afterCompletion --- ");

        long startTime = (Long) request.getAttribute("startTime");
        long endTime = System.currentTimeMillis();
        System.out.println("Request URL: " + request.getRequestURL());
        System.out.println("End Time: " + endTime);

        System.out.println("Time Taken: " + (endTime - startTime));
    }
}
6.3.2 OldLoginInterceptor类
public class OldLoginInterceptor extends HandlerInterceptorAdapter {

    @Override
    public boolean preHandle(HttpServletRequest request, HttpServletResponse response, Object handler) throws Exception {
        System.out.println("\n-------- OldLoginInterceptor.preHandle --- ");
        System.out.println("Request URL: " + request.getRequestURL());
        System.out.println("Sorry! This URL is no longer used, Redirect to /admin/login");

        response.sendRedirect(request.getContextPath()+ "/admin/login");
        return false;
    }

    @Override
    public void postHandle(HttpServletRequest request, HttpServletResponse response, Object handler, ModelAndView modelAndView) throws Exception {
        System.out.println("\n-------- OldLoginInterceptor.postHandle --- ");
    }

    @Override
    public void afterCompletion(HttpServletRequest request, HttpServletResponse response, Object handler, Exception ex) throws Exception {
        System.out.println("\n-------- OldLoginInterceptor.afterCompletion --- ");
    }
}
6.3.3 配置拦截器
@Configuration
public class WebConfig implements WebMvcConfigurer {

    @Override
    public void addInterceptors(InterceptorRegistry registry) {
        registry.addInterceptor(new LogInterceptor());

        registry.addInterceptor(new OldLoginInterceptor()).addPathPatterns("/admin/oldLogin");

        registry.addInterceptor(new AdminInterceptor()).addPathPatterns("/admin/*").excludePathPatterns("/admin/oldLogin");
    }
}- LogInterceptor 拦截器用于拦截所有请求; OldLoginInterceptor 用来拦截链接 “ / admin / oldLogin”,它将重定向到新的 “ / admin / login”。;AdminInterceptor用来拦截链接 “/admin/*”,除了链接 “ / admin / oldLogin”。
6.4 应用
6.4.1 性能监控
如记录一下请求的处理时间,得到一些慢请求(如处理时间超过500毫秒),从而进行性能改进,一般的反向代理服务器如 apache 都具有这个功能,但此处我们演示一下使用拦截器怎么实现。
实现分析
- 在进入处理器之前记录开始时间,即在拦截器的 preHandle 记录开始时间;
- 在结束请求处理之后记录结束时间,即在拦截器的 afterCompletion 记录结束实现,并用结束时间-开始时间得到这次请求的处理时间
问题:
我们的拦截器是单例,因此不管用户请求多少次都只有一个拦截器实现,即 线程不安全,那我们应该怎么记录时间呢?
解决方案是使用 ThreadLocal,它是线程绑定的变量,提供线程局部变量(一个线程一个 ThreadLocal,A线程的ThreadLocal 只能看到A线程的 ThreadLocal,不能看到B线程的 ThreadLocal)。
代码实现:
public class StopWatchHandlerInterceptor extends HandlerInterceptorAdapter {
    private NamedThreadLocal<Long> startTimeThreadLocal = new NamedThreadLocal<>("StopWatch-StartTime");
    private Logger logger = LoggerFactory.getLogger(StopWatchHandlerInterceptor.class);

    @Override
    public boolean preHandle(HttpServletRequest request, HttpServletResponse response, Object handler) throws Exception {
        long beginTime = System.currentTimeMillis();//1、开始时间
        startTimeThreadLocal.set(beginTime);//线程绑定变量(该数据只有当前请求的线程可见)
        return true;//继续流程
    }

    @Override
    public void afterCompletion(HttpServletRequest request, HttpServletResponse response, Object handler, Exception ex) throws Exception {
        long endTime = System.currentTimeMillis();//2、结束时间
        long beginTime = startTimeThreadLocal.get();//得到线程绑定的局部变量(开始时间)
        long consumeTime = endTime - beginTime;//3、消耗的时间
        if(consumeTime > 500) {//此处认为处理时间超过500毫秒的请求为慢请求
            //TODO 记录到日志文件
            logger.info(String.format("%s consume %d millis", request.getRequestURI(), consumeTime));
        }
        //测试的时候由于请求时间未超过500,所以启用该代码
//        logger.info(String.format("%s consume %d millis", request.getRequestURI(), consumeTime));

    }
}
NamedThreadLocal:Spring提供的一个命名的ThreadLocal实现。
在测试时需要把 stopWatchHandlerInterceptor 放在拦截器链的第一个,这样得到的时间才是比较准确的。
拦截器配置类
@Configuration
public class WebConfig implements WebMvcConfigurer {

    @Override
    public void addInterceptors(InterceptorRegistry registry) {
        registry.addInterceptor(new StopWatchHandlerInterceptor());

        registry.addInterceptor(new OldLoginInterceptor()).addPathPatterns("/admin/oldLogin");

    }
}
6.4.2 登录检测
在访问某些资源时(如订单页面),需要用户登录后才能查看,因此需要进行登录检测。
流程
- 访问需要登录的资源时,由拦截器重定向到登录页面;
- 如果访问的是登录页面,拦截器不应该拦截;
- 用户登录成功后,往 cookie/session 添加登录成功的标识(如用户编号);
- 下次请求时,拦截器通过判断 cookie/session 中是否有该标识来决定继续流程还是到登录页面;
- 在此拦截器还应该允许游客访问的资源。
代码实现
public class MyInterceptor implements HandlerInterceptor {

    @Override
    public boolean preHandle(HttpServletRequest request, HttpServletResponse response, Object handler) throws Exception {
        boolean flag = true;
        String ip = request.getRemoteAddr();
        long startTime = System.currentTimeMillis();
        request.setAttribute("requestStartTime", startTime);
        if (handler instanceof ResourceHttpRequestHandler) {
            System.out.println("preHandle这是一个静态资源方法!");
        } else if (handler instanceof HandlerMethod) {
            HandlerMethod handlerMethod = (HandlerMethod) handler;
            Method method = handlerMethod.getMethod();
            System.out.println("用户:" + ip + ",访问目标:" + method.getDeclaringClass().getName() + "." + method.getName());
        }

        //如果用户未登录
        User user = (User) request.getSession().getAttribute("user");
        if (null == user) {
            //重定向到登录页面
            response.sendRedirect("toLogin");
            flag = false;
        }
        return flag;
    }

    @Override
    public void postHandle(HttpServletRequest request, HttpServletResponse response, Object handler, ModelAndView modelAndView) throws Exception {
        if (handler instanceof ResourceHttpRequestHandler) {
            System.out.println("postHandle这是一个静态资源方法!");
        } else if (handler instanceof HandlerMethod) {
            HandlerMethod handlerMethod = (HandlerMethod) handler;
            Method method = handlerMethod.getMethod();
            long startTime = (long) request.getAttribute("requestStartTime");
            long endTime = System.currentTimeMillis();
            long executeTime = endTime - startTime;

            int time = 1000;
            //打印方法执行时间
            if (executeTime > time) {
                System.out.println("[" + method.getDeclaringClass().getName() + "." + method.getName() + "] 执行耗时 : "
                        + executeTime + "ms");
            } else {
                System.out.println("[" + method.getDeclaringClass().getSimpleName() + "." + method.getName() + "] 执行耗时 : "
                        + executeTime + "ms");
            }
        }
    }

}
7.文件上传/下载
7.1 文件上传/下载流程概述
7.1.1 文件上传
- 当客户端发送文件上传请求时,Spring Boot会接收到一个包含文件的MultipartHttpServletRequest对象。
- 在控制器方法中,可以通过参数接收这个MultipartHttpServletRequest对象,并从中获取上传的文件。
- Spring Boot会将上传的文件存储到临时目录中,可以通过MultipartFile对象的getOriginalFilename()方法获取文件名,通过getBytes()方法获取文件内容。
- 文件上传后,可以将其保存到服务器的持久化存储中,例如本地磁盘、云存储等。
7.1.2 文件下载
- 当客户端发送文件下载请求时,Spring Boot会根据请求的URL找到对应的文件。
- 找到文件后,需要将文件的内容写入到Response的输出流中,为了防止浏览器解析,需要在响应头中设置正确的MIME类型(Content-Type)。
- 如果要实现断点续传功能,需要根据文件的元数据信息判断是否已经下载过该文件,如果已经下载过,则直接返回已存在的文件内容即可。
7.2 实现过程
7.2.1 添加依赖
<dependency>
    <groupId>org.springframework.boot</groupId>
    <artifactId>spring-boot-starter-web</artifactId>
</dependency>
<dependency>
    <groupId>commons-io</groupId>
    <artifactId>commons-io</artifactId>
    <version>2.4</version>
</dependency>
7.2.2 配置文件上传大小限制
server:
  port: 18080

spring:
  servlet:
    multipart:
      max-file-size: 10MB
      max-request-size: 10MB
7.2.3 上传控制器
- 创建一个控制器类,用于处理文件上传请求。在这个类中,使用
@PostMapping注解指定处理POST请求的方法,并使用@RequestParam("file") MultipartFile file参数接收上传的文件。
// 创建文件上传控制器
@RestController
@RequestMapping("/api/upload")
public class FileUploadController {
    // 处理文件上传请求的POST方法
    @PostMapping("/")
    public ResponseEntity<String> handleFileUpload(@RequestParam("file") MultipartFile file) {
        try {
            // 获取上传文件的文件名
            String fileName = file.getOriginalFilename();
            // 将文件保存到磁盘或执行其他操作,这里只是简单地将文件保存到静态资源目录下
            file.transferTo(new File("D:/" + fileName));
            return new ResponseEntity<>("文件上传成功!", HttpStatus.OK);
        } catch (Exception e) {
            return new ResponseEntity<>("文件上传失败:" + e.getMessage(), HttpStatus.INTERNAL_SERVER_ERROR);
        }
    }
}
7.2.4 下载控制器
- 创建一个控制器类,用于处理文件下载请求。在这个类中,我们将使用@GetMapping注解指定处理GET请求的方法,并使用@RequestParam("filename") String fileName参数接收要下载的文件名。然后,我们可以使用文件名来获取要下载的文件,并将其作为响应返回给客户端。
- 为了让Spring Boot能够找到静态资源(如文件),你需要在
src/main/resources目录下创建一个名为static的文件夹,并在其中创建一个名为files的文件夹,用于存放要下载的文件。
@RestController
@RequestMapping("/api/download")
public class FileDownloadController {

    private static final Logger log = LoggerFactory.getLogger(FileDownloadController.class);

    @Autowired
    private ResourceLoader resourceLoader;

    // 处理文件下载请求的GET方法,通过文件名获取文件并返回给客户端下载
    @GetMapping("/{filename:.+}")
    public ResponseEntity<Resource> handleFileDownload(@PathVariable String filename) throws IOException {
        // 获取要下载的文件的Resource对象,这里假设文件保存在静态资源目录下的files文件夹中
        Resource resource = resourceLoader.getResource("classpath:static/files/" + filename);
        if (resource == null) {
            return new ResponseEntity<>(HttpStatus.NOT_FOUND);
        }
        // 将文件内容包装为响应体,并设置响应头信息,提示浏览器下载文件而不是打开文件
        InputStreamResource inputStreamResource = new InputStreamResource(resource.getInputStream());
        HttpHeaders headers = new HttpHeaders();
        headers.add(HttpHeaders.CONTENT_DISPOSITION, "attachment; filename=" + filename);
        return ResponseEntity.ok()
                .headers(headers)
                .contentType(MediaTypeFactory.getMediaType(resource).get())
                .body(inputStreamResource);
    }
}
8.SpringBoot访问静态资源
8.1 何为静态资源
静态资源,一般是网页端的:HTML文件、JavaScript文件和图片。尤其是设置图片的静态资源,尤其重要:
8.2 设置访问静态资源的两种方法
- Springboot内设置静态资源,或者说静态资源文件夹,主要有两种方法(均为SpringMVC实现):
- 在
application.yml/application.properties内配置。 - 设置
Configuration配置类。
- 在
以上两种方法,均可实现用户访问网址,不走Controller层的拦截,直接进行静态文件访问。
8.2.1 application设置方法
(1)配置详讲
spring.mvc.static-path-pattern:根据官网的描述和实际效果,可以理解为**静态文件URL匹配头**,也就是静态文件的URL地址开头。Springboot默认为:/**。spring.web.resources.static-locations:根据官网的描述和实际效果,可以理解为==实际静态文件地址==,也就是静态文件URL后,匹配的实际静态文件。Springboot默认为: classpath:/META-INF/resources/,classpath:/resources/,classpath:/static/,classpath:/public/注意:
- spring.web.resources.static-locations是后续配置,旧版Springboot的配置项为:spring-resources-static-locations;在2.2.5版本之后,旧版本配置已经失效。
- spring.web.resources.static-locations有多个配置项,在Springboot编译后,会合并为一个文件。多个配置文件,使用,进行分割。
- spring.web.resources.static-location仅仅允许一个配置,无法使用,进行分割,如果需要多个静态资源文件,可以使用下文的配置类方法。
- spring.web.resources.static-locations可以使用classpath、file进行匹配。如果使用file,这个时候的相对路径为项目地址(打包为.jar后,相对路径就是.jar运行地址)。
(2)实践
最终效果:
浏览器输入:
http://localhost:8088/SystemData/UserData/Avatar/Mintimate.jpeg可以直接访问项目文件下的:
/SystemData/UserData/Avatar/Mintimate.jpeg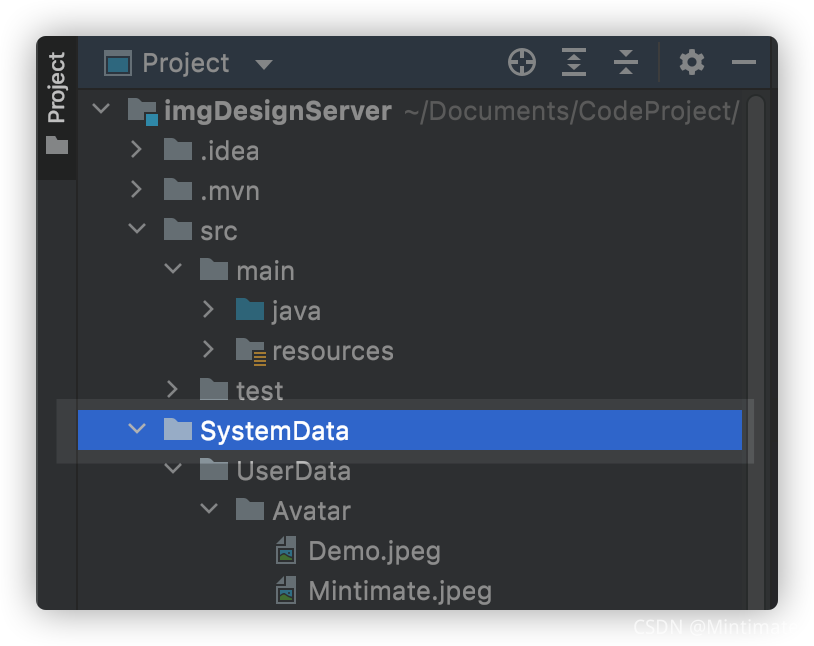
配置文件:
spring:
  mvc:
  	# URL响应地址(Springboot默认为/**)
    static-path-pattern: /SystemData/**
  web:
    resources:
      # 静态文件地址,保留官方内容后,进行追加
static-locations: classpath:/static,classpath:/public,classpath:/resources,classpath:/META-INF/resources,file:SystemData其中,file:SystemData就是映射本地文件了。
(3)优缺点
- 优点:简单粗暴
- 缺点:
- URL响应地址只能为一项,也就是
spring.mvc.static-path-pattern配置只能写一项 - 上文设置了
/SystemData/**为URL匹配,就不能设置第二个/resources/**这样的配置为第二静态目录 - 如果需要设置多个地址为静态资源目录,可以参考下文的
设置配置类方法方法。
- URL响应地址只能为一项,也就是
8.2.2 设置配置类方法
(1)方法介绍
写一个配置类,实现静态资源的文件夹方法很多。比如:
继承于
WebMvcConfigurationSupport父类,并实现addResourceHandlers方法。@Override protected void addResourceHandlers(ResourceHandlerRegistry registry) { }这里的
registry使用链式编程,方法为:addResourceHandler:添加URL响应地址目录。addResourceLocations:添加实际资源目录。
引用
WebMvcConfigurer接口,并实现addInterceptors方法(常用)
一些文章可能会让你继承于
WebMvcConfigurerAdapter方法,但是实际上WebMvcConfigurerAdapter方法在Spring5.0和Springboot2.0之后,已经弃用。
(2)实践
最终效果1:
- 浏览器输入:
http://localhost:8088/SystemData/UserData/Avatar/Mintimate.jpeg - 可以直接访问项目文件下的:
/SystemData/UserData/Avatar/Mintimate.jpeg,
- 浏览器输入:
最终效果2:
- 浏览器输入:
http://localhost:8088/SystemDataTest/UserData/Avatar/Mintimate.jpeg - 可以直接访问项目文件下的:
/Test/UserData/Avatar/Demo.jpeg,
- 浏览器输入:
添加一个配置类,并继承
WebMvcConfigurationSupport,实现addResourceHandlers方法,并打上@Configuration注解,使其成为配置类:
@Configuration
public class WebConfig extends WebMvcConfigurationSupport{
    @Override
	protected void addResourceHandlers(ResourceHandlerRegistry registry) {
        //定位到项目文件夹下的SystemData文件夹
        static final String IMG_PATH=System.getProperty("user.dir")+"/SystemData/";
        static final String IMG_PATH_TWO=System.getProperty("user.dir")+"/Test/";

        registry.addResourceHandler("/SystemData/**)")
            	.addResourceLocations("file:"IMG_PATH);
        registry.addResourceHandler("/SystemDataTest/**)")
            	.addResourceLocations("file:"IMG_PATH_TWO);
        super.addResourceHandlers(registry);
	}
}
(3)优缺点
- 相比前文,这样的配置更麻烦。
- 相比前文,这样的可塑性更高:可以添加更多的映射、不会对默认配置造成覆盖等。